How to Choose the Right Peel Tester Machine?
Choosing a peel tester machine begins with the material, not the brochure. A flexible label, laminated film, and medical dressing can behave very differently under the same pull. ASTM D3330/D3330M describes six methods for measuring pressure-sensitive tape adhesion, while ISO 8510-2 covers a 180-degree peel test for bonded assemblies. These technical references help define test setup; they do not make every instrument interchangeable.
Look closely at force capacity, speed control, grip design, travel distance, and data capture. A narrow force range can hide small differences. Slipping jaws can distort results. On a busy production bench, clear software and repeatable fixtures matter as much as the load cell. Check calibration documentation and ask whether the supplier can demonstrate your actual sample, adhesive, and peel angle. Bring real specimens. It is a simple step, but often skipped.
A reliable choice should fit your test method and your daily workflow. It should also leave a traceable record that another operator can understand. One limitation deserves honesty: without a verifiable source, attributing a peel-tester-specific quotation to a named industry expert would risk inventing evidence. ASTM and ISO references provide a defensible starting point; verified expert commentary and relevant test data should be checked before publication. A machine can measure force. Good selection turns that measurement into a decision you can trust.
Understand What a Peel Tester Measures
How to Choose the Right Peel Tester Machine?
Understand What a Peel Tester Measures
A peel tester measures the force needed to separate two joined materials as one is pulled away from the other. The result is often reported as force per unit width, such as newtons per millimetre. It is not a direct score for “good” or “bad” adhesion. The reading depends on the materials, specimen width, peel angle, pulling speed, and test conditions. Small setup changes matter.
The machine records force as the bond separates, producing a curve rather than just one number. Peak force can show a strong initial resistance, while average force describes separation across a chosen distance. Both can be useful. Watch for sudden drops, too. They may indicate uneven bonding, tearing, or a shift in the specimen. A neat average can hide those details.
Test geometry should match the product or the method being followed. A flexible label peeled from a panel may need a different setup from a seal pulled apart at 180 degrees. Keep the specimen aligned in the grips, and use consistent width and conditioning time. Otherwise, results may vary for reasons unrelated to the bond. Even careful testing has limits: a peel value alone cannot explain every failure, so inspect the separated surfaces and note whether the adhesive, backing, or substrate gave way.
How to Choose the Right Peel Tester Machine? — Understand What a Peel Tester Measures
A peel tester records the force required to separate bonded materials as they are pulled apart. This illustrative 180° peel-test chart shows force per 25 mm specimen width across peel distance; actual results depend on the materials, test speed, conditioning, and method.
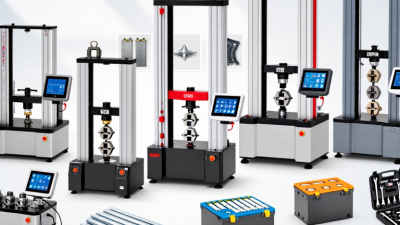
Look for a tester that can control the required peel angle and test speed, accommodate your specimen dimensions, and record force over the test distance. The traces below are illustrative, not product test results.
Identify Your Materials and Required Test Standards
Before choosing a peel tester, identify the exact material stack: adhesive, backing, release liner, and substrate. A paper label on glass behaves differently from a flexible film on coated board. Record thickness, surface finish, conditioning time, and application pressure; small differences can shift results. A peel tester should hold the specimen securely and maintain a consistent angle and speed. Short samples can distort the result.
Match the test to the product and its intended use. ASTM D3330/D3330M describes six procedures for measuring pressure-sensitive tape peel adhesion, while ISO 8510-2 covers 180-degree peeling of flexible-to-rigid bonded assemblies. These are not interchangeable. Check the applicable procedure for specimen width, peel angle, speed, and conditioning before comparing results. Report force per unit width, such as N/25 mm, and retain the force-versus-distance curve when possible. Averages can hide sudden drops. For a particular material, run replicate tests and note failures such as adhesive transfer or backing tear. The standard gives a starting point, not a substitute for judgment; even careful labs may find that real packaging needs a modified fixture.
How to Choose the Right Peel Tester Machine? - Identify Your Materials and Required Test Standards
| Material or Application |
Common Test Purpose |
Relevant Standard |
Typical Test Configuration |
Tester Features to Consider |
| Pressure-sensitive tape bonded to a standard panel |
Measure peel adhesion of tape from a test panel under specified conditions. |
ASTM D3330/D3330M |
Typically a 180° peel; the method and panel depend on the tape type and the applicable procedure. |
Controlled peel angle, suitable load cell, consistent crosshead speed, and a panel or fixture arrangement matching the selected method. |
| Flexible adhesive joint bonded to a rigid adherend |
Measure the force needed to peel or strip an adhesive bond. |
ASTM D903; ISO 8510-2 |
ASTM D903 commonly uses a 180° peel arrangement. ISO 8510-2 covers a 180° peel test for a flexible adherend bonded to a rigid adherend. |
Stable gripping of the flexible specimen, alignment that minimizes twisting, and a load range suited to the expected peel force. |
| Two flexible adherends joined by an adhesive |
Evaluate the peel resistance of flexible-to-flexible adhesive bonds. |
ASTM D1876; ISO 11339 |
T-peel, with the two unbonded ends pulled apart in opposite directions. |
Two aligned grips, adequate travel, consistent grip separation, and suitable capacity for the bond strength and specimen width. |
| Flexible packaging film or laminate heat seals |
Measure the force required to separate a seal and assess seal strength. |
ASTM F88/F88M |
A seal specimen is pulled in tension using the selected supported, unsupported, or other specified technique. |
Appropriate grips for thin films, reliable force measurement, adjustable test speed, and fixtures compatible with the chosen technique. |
| Flexible material bonded to a rigid adherend where a 90° geometry is specified |
Measure peel resistance using a right-angle peel configuration. |
ISO 8510-1 |
90° peel of a flexible adherend from a rigid adherend. |
A 90° peel fixture or equivalent controlled geometry, secure specimen holding, and sufficient test travel. |
Selection tip: Confirm the exact standard, method, specimen dimensions, conditioning, peel angle, test speed, and reporting requirements before choosing a tester. Standard editions and procedures may be updated; consult the applicable current standard for compliance.
Compare Test Modes, Force Capacity, and Measurement Accuracy
Choosing a peel tester starts with the failure mode, not the machine’s maximum force.
ASTM D3330/D3330M describes several pressure-sensitive tape adhesion methods, including 180-degree and 90-degree peel tests. Match the method to the real joint: a flexible label peeled from a rigid panel behaves differently from a laminate bent around a roller. Check the required angle, speed, specimen width, and backing support before comparing instruments. Small details matter.
Force capacity should fit the expected peak, not simply look impressive.
A load cell sized far above the sample’s force can make small changes harder to resolve. One producing noisy readings can overload during a sudden release. Choose a capacity that keeps routine results comfortably within the instrument’s working range, then confirm its resolution near your lowest expected reading. Try a representative sample; real materials can surprise you.
Accuracy needs documented verification, not a polished screen display.
ISO 7500-1:2018 defines force-measuring accuracy classes, including Class 1 at ±1% and Class 0.5 at ±0.5% of indicated force. Ask for calibration records covering the range you will actually use. Also inspect alignment, grip slippage, and speed control; each can distort a peel result. ASTM method conditions help comparison, but they do not remove every source of variation. Conditioning is easy to overlook.
Match the Tester to Your Application and Budget
A peel tester should match the materials, test method, and sample size you use every day. Start with the required peel angle, speed, and force range. Flexible packaging may need a different fixture from adhesive labels or coated films. Fit matters. A sample that slips or wrinkles can produce misleading results, even on a capable machine.
Check the force range before comparing prices. A sensor sized for heavy samples may not measure small peel forces reliably. Ask whether the tester supports your chosen test method and records force, distance, and test speed. If results must be compared over time, look for clear calibration procedures and repeatable settings. Do not pay for advanced features your lab will rarely use.
Budget for more than the machine itself. Include fixtures, calibration, training, software, and service costs. A simpler tester may suit occasional checks, while frequent testing can justify automation that reduces operator variation. I would compare the full cost over several years, not just the purchase price. It is easy to over-specify; still, buying too little capacity can mean repeating tests or replacing equipment sooner than expected.